Pressure Measurement
Pressure Gauge
Working

- Gauge pressure sensor
- Absolute pressure sensor
- Vacuum pressure sensor
- Differential pressure sensor
- Sealed pressure sensor
Pressure Gauge
Working
- Pressure gauge works on hooks law principle ,when we applying pressure in end connection of the pressure gauge ,the same pressure operating at end of the bourdon tube.
- Within the elastic limit of a solid material, the deformation (strain) produced by a force (stress) of any kind is proportional to the force. If the elastic limit is not exceeded, the material returns to it original shape and size after the force is removed, other it remains deformed or stretched. The force at which the material exceeds its elastic limit is called 'limit of proportionality.'

Important Specification in Pressure Gauge Selection
- Process Medium
- Range
- Operation Environment
- Accuracy Requirements
- Dial Size
- Process Connection
- Mounting Requirement
Master Equipment for Pressure Gauge
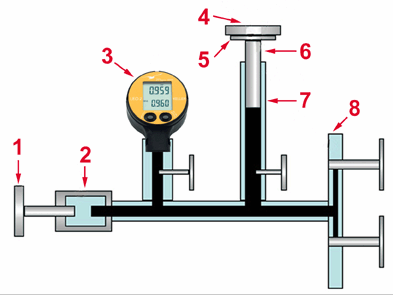
Dead Weight Testers

1 - Handpump
2 - Testing Pump
3 - Pressure Gauge to be calibrated
4 - Calibration Weight
5 - Weight Support
6 - Piston
7 - Cylinder
8 - Filling Connection Dead weight testers are a piston-cylinder type measuring device. As primary standards, they are the most accurate instruments for the calibration of electronic or mechanical pressure measuring instruments.
They work in accordance with the basic principle that P= F/A, where the pressure (P) acts on a known area of a sealed piston (A), generating a force (F). The force of this piston is then compared with the force applied by calibrated weights. The use of high quality materials result in small uncertainties of measurement and excellent long term stability.
Dead weight testers can measure pressures of up to 10,000 bar, attaining accuracies of between 0.005% and 0.1% although most applications lie within 1 - 2500 bar. The pistons are partly made of tungsten carbide (used for its small temperature coefficient), and the cylinders must fit together with a clearance of no more than a couple of micrometers in order to create a minimum friction thus limiting the measuring error. The piston is then rotated during measurements to further minimise friction.
The testing pump (2) is connected to the instrument to be tested (3), to the actual measuring component and to the filling socket. A special hydraulic oil or gas such as compressed air or nitrogen is used as the pressure transfer medium. The measuring piston is then loaded with calibrated weights (4). The pressure is applied via an integrated pump (1) or, if an external pressure supply is available, via control valves in order to generate a pressure until the loaded measuring piston (6) rises and 'floats' on the fluid. This is the point where there is a balance between pressure and the mass load. The piston is rotated to reduce friction as far as possible. Since the piston is spinning, it exerts a pressure that can be calculated by application of a derivative of the formula P = F/A.
The accuracy of a pressure balance is characterised by the deviation span, which is the sum of the systematic error and the uncertainties of measurement.
Today's dead weight testers are highly accurate and complex and can make sophisticated physical compensations. They can also come accompanied by an intelligent calibrator unit which can register all critical ambient parameters and automatically correct them in real time making readings even more accurate


No comments:
Post a Comment